嵌入式开发中串口是调试的常用方式,printf作为调试最常用的方式是需要重定向的,不同的编译器有不同的重定向方式。
1、GCC开发环境
#if !defined(__CROSSWORKS_ARM) && defined(__GNUC__)

#include <sys/stat.h>
#include <stddef.h>


int _close(int file);
void _exit(int status);
int _fstat(int file, struct stat *st);
int _getpid(void);
int _isatty(int file);
int _kill(int pid, int sig);
int _lseek(int file, int ptr, int dir);
int _read(int file, char *ptr, int len);
int _write(int file, const char *ptr, int len);

/**************************************************************************//**
* Close a file.
*
* @param[in] file File you want to close.
*
* @return Returns 0 when the file is closed.
*****************************************************************************/
int _close(int file)
{
  (void) file;
  return 0;
}

/**************************************************************************//**
* Exit the program.
*
* @param[in] status The value to return to the parent process as the
* exit status (not used).
*****************************************************************************/
void _exit(int status)
{
  (void) status;
  while (1) {
  } // Hang here forever...
}

/**************************************************************************//**
* Status of an open file.
*
* @param[in] file Check status for this file.
*
* @param[in] st Status information.
*
* @return Returns 0 when st_mode is set to character special.
*****************************************************************************/
int _fstat(int file, struct stat *st)
{
  (void) file;
  st->st_mode = S_IFCHR;
  return 0;
}

/**************************************************************************//**
* Get process ID.
*
* @return Return 1 when not implemented.
*****************************************************************************/
int _getpid(void)
{
  return 1;
}

/**************************************************************************//**
* Query whether output stream is a terminal.
*
* @param[in] file Descriptor for the file.
*
* @return Returns 1 when query is done.
*****************************************************************************/
int _isatty(int file)
{
  (void) file;
  return 1;
}

/**************************************************************************//**
* Send signal to process.
*
* @param[in] pid Process id (not used).
*
* @param[in] sig Signal to send (not used).
*****************************************************************************/
int _kill(int pid, int sig)
{
  (void)pid;
  (void)sig;
  return -1;
}

/**************************************************************************//**
* Set position in a file.
*
* @param[in] file Descriptor for the file.
*
* @param[in] ptr Poiter to the argument offset.
*
* @param[in] dir Directory whence.
*
* @return Returns 0 when position is set.
*****************************************************************************/
int _lseek(int file, int ptr, int dir)
{
  (void) file;
  (void) ptr;
  (void) dir;
  return 0;
}

/**************************************************************************//**
* Read from a file.
*
* @param[in] file Descriptor for the file you want to read from.
*
* @param[in] ptr Pointer to the chacaters that are beeing read.
*
* @param[in] len Number of characters to be read.
*
* @return Number of characters that have been read.
*****************************************************************************/
int _read(int file, char *ptr, int len)
{
  (void)file;

  return readBuffer(ptr, len);
}

/**************************************************************************//**
* Write to a file.
*
* @param[in] file Descriptor for the file you want to write to.
*
* @param[in] ptr Pointer to the text you want to write
*
* @param[in] len Number of characters to be written.
*
* @return Number of characters that have been written.
*****************************************************************************/
int _write(int file, const char *ptr, int len)
{
  (void)file;

  return writeBuffer(ptr, len);
}

#endif /* !defined( __CROSSWORKS_ARM ) && defined( __GNUC__ ) */
在自己的程序中,只需实现:
int writeBuffer(char *ch, int length);
int readBuffer(char *ch, int length);
2、keil开发环境
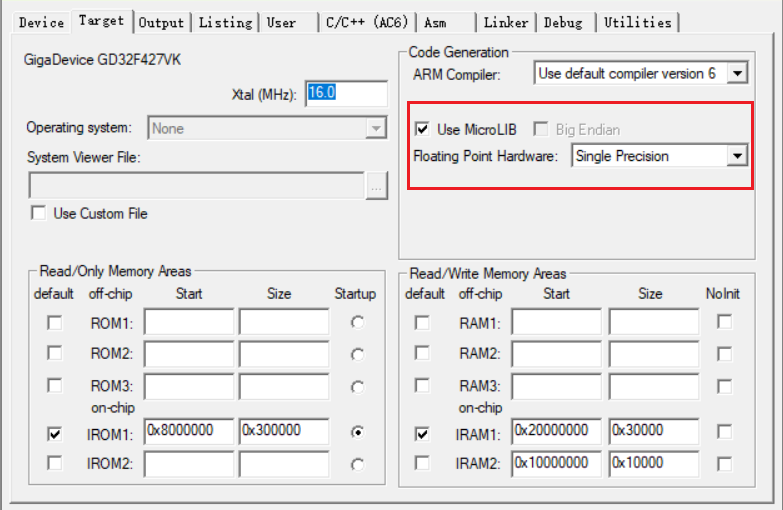
2.1、使用MicroLib
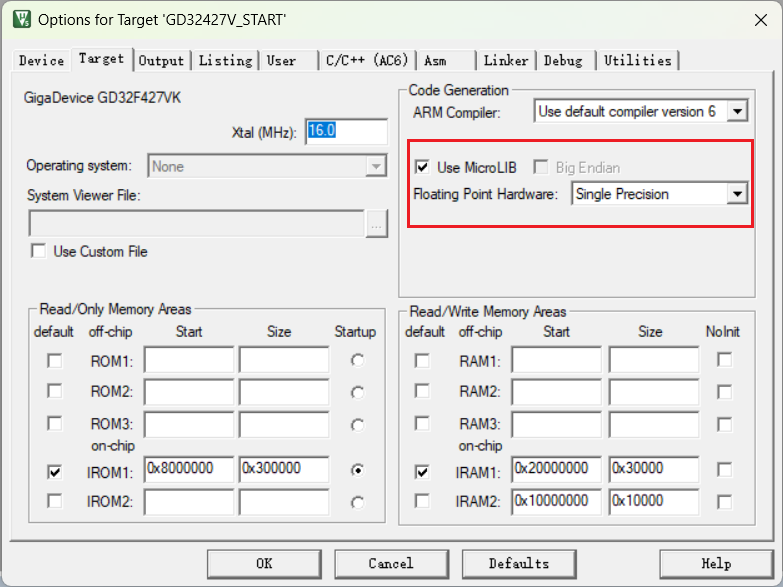
在代码中实现fputc函数
// 重定向printf
int fputc(int ch, FILE *f){
  HAL_UART_Transmit(&huart1, (uint8_t *)&ch, 1, 1000);
  return ch;
}

// 重定向getchar
int fgetc(FILE *f)
{
  int ch;
  while (__HAL_UART_GET_FLAG(&huart1, UART_FLAG_RXNE) == RESET);
  HAL_UART_Receive(&huart1, (uint8_t *)&ch, 1, 0xFFFF);
  return (ch);
}
2.2、使用非半主机模式
新建syscalls.c
#if defined(__CC_ARM)
/******************************************************************************/
/* RETARGET.C: 'Retarget' layer for target-dependent low-level functions */
/******************************************************************************/
/* This file is part of the uVision/ARM development tools. */
/* Copyright (c) 2005-2006 Keil Software. All rights reserved. */
/* This software may only be used under the terms of a valid, current, */
/* end user licence from KEIL for a compatible version of KEIL software */
/* development tools. Nothing else gives you the right to use this software. */
/******************************************************************************/

#include <stdio.h>

#pragma import(__use_no_semihosting_swi)

struct __FILE{
  int handle;
};

//Standard output stream
FILE __stdout;

/**************************************************************************//**
* Writes character to file
*
* @param[in] f File
*
* @param[in] ch Character
*
* @return Written character
*****************************************************************************/
int fputc(int ch, FILE *f)
{
  return putChar(ch);
}

/**************************************************************************//**
* Reads character from file
*
* @param[in] f File
*
* @return Character
*****************************************************************************/
int fgetc(FILE *f)
{
return getChar();
}

/**************************************************************************//**
* Tests the error indicator for the stream pointed to by file
*
* @param[in] f File
*
* @return Returns non-zero if it is set
*****************************************************************************/
int ferror(FILE *f)
{
  // Your implementation of ferror
  return EOF;
}

/**************************************************************************//**
* Writes a character to the console
*
* @param[in] ch Input character
*****************************************************************************/
void _ttywrch(int ch)
{
  putChar(ch);
}

/**************************************************************************//**
* Library exit function. This function is called if stack overflow occurs.
*
* @param[in] return_code Return code
*****************************************************************************/
void _sys_exit(int return_code)
{
  label: goto label; // endless loop
}

#endif /* defined( __CC_ARM ) */